Lister Star Clipper Clipping With The Star Clipper: Preparing The Animal: Tensioning The Clipper Blades (Fig. 1): 1 Wipe the head and blades (including between teeth) absolutely clean. 2 Fit blades onto the clipper head and screw the tension nut down tight. 3 Turn the tension nut back 1 1/2 turns, this is the correct setting. The tension nut marker line (A) will ensure accuracy. 4 Oil the blades and head, switch the clipper on and run briefly. 5 Switch off and wipe off any excess oil. Lubrication (Fig. 1): 1 Oil between cutters points. 2 Oil between clipper head front pads and top of cutter. 3 Oil cutter blade guide channel. (Turn clipper upside down to oil.) 4 Oil cutter blade heel from both sides. 5 Oil crank shaft and roller through hole on top of head. Oil every 10 to 15 minutes running - wipe off excess oil. Warning: The use of spray lubricants is not recommended. Use Lister R15 oil which is specially formulated for clipping. If blades run hot, you are not oiling often enough, using too little oil or not oiling in the right places. It is not necessary to remove the clipper head during maintenance. This should only be done during a major service. Care Of Blades: The teeth could break if the blades are knocked. The steel blades especially hardened for good cutting qualities are more brittle than unhardened teeth. Blade Protection: Clipping With New Blades: If the blades fail to cut when first used, stop work immediately. Do not increase tension-this can only be harmful. Remove and clean the blades as even a small amount of dirt or a single hair may be the cause of the trouble. Brush between the teeth and wipe the blades and head clean. Fit the blades back on to the clipper, then set the tension correctly and oil. Should the clipper fail to cut again, repeat the cleaning procedure. Use Lister R15 oil or very light machine oil. Failure To Cut: Remove the blades from the clipper. Wipe the clipper head clean to prevent stray hairs getting between the blades. Brush between the blade teeth and wipe the blades clean. Fit the blades back on to the clipper. Finally set the tension correctly and oil. The slightest bruise on the face of either blade is sufficient to stop them cutting altogether. Blades should be kept together as matched sets. When the blades have lost their cutting edge return them to a qualified firm for regrinding. Maintenance (Figs. 2 & 3): Gears (Fig. 2): Every 100 hours running remove the clipper head (1). Wipe the clipper head and gearwheel (2) to remove hair and used grease. Coat the gearwheel with clean grease (Lister R2 or Shell Alvania R2 or equivalent). When the clipper head is removed check the gearwheel for wear and broken teeth. Filters (Fig. 3): Warning: All maintenance should be carried out with the unit switched off and removed from main supply. Reset Button (Fig. 3): Caution: Each season before use have your equipment inspected and tested by a qualified electrician. Only use the clipper at the correct voltage as shown on the specification plate. The electrical equipment is not waterproof. Keep and use in dry conditions. Disconnect from mains before fitting blades or dismantling clipper.
Premier 1
The Star clipper is different to most clippers in that it maintains a virtually constant speed irrespective of load. Normally during clipping a clipper will slow down when lubrication is required. The Star however, does not slow down appreciably - therefore regular oiling with Lister R15 oil is essential to prevent the temperature of the blades rising. In other words, if the blades get hot you are not oiling them often enough or in the right places.
The clipper cannot be expected to cut properly if the animal is wet and dirty. The animal must be clean and dry.
Oil the moving parts before starting the motor. It is necessary to turn the clipper sideways for effective lubrication of the blade rear surfaces and upside down to oil the cutter blade guide channels.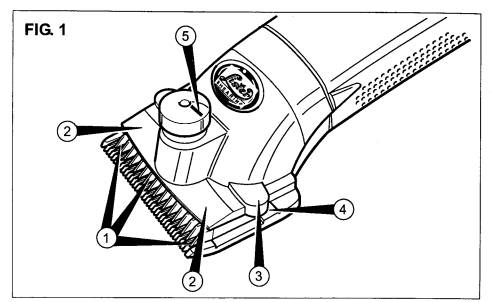
Blades should be kept together as matched sets.
Wipe blades absolutely clean. This is essential if the clipper is to work properly. The blades are ground and then lapped to a very fine precision finish.
New or reground blades must be cleaned, then tensioned correctly and oiled before use.
If the blades fail to cut--do not increase tension. Excessive tension will only cause overheating and will blunt the blades. The clipper will not cut if hair or dirt gets between the blades.
It is particularly important to keep plug and cable clean, dry and in good order at all times. The motor and drive gears can be expected to give years of trouble free use if maintained and serviced regularly. The following should be carried out at the end of each season, or more regularly if used extensively.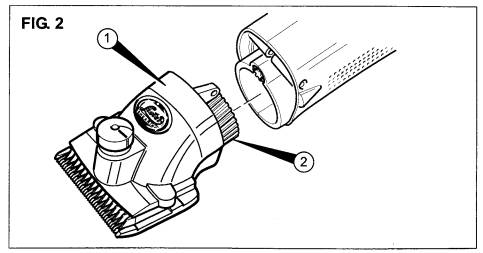
The two motor air filters shown in Fig. 3 should be frequently removed and meticulously cleaned (brush supplied) to ensure efficient running of the motor. To clear the gauzes, a high-pressure air-line is ideal-otherwise wash in detergent solution and dry carefully. If this maintenance is ignored overheating of the motor could occur with possible irreversible damage to the motor, or inefficient clipping at the very least. Do not run motor with filters removed.
The Star Clipper is fitted with an overload protection switch which will trip if the clipper is overloaded. Should this occur, the unit should be thoroughly checked before fully depressing the button to reset. The button is situated at the back end of the motor body (B).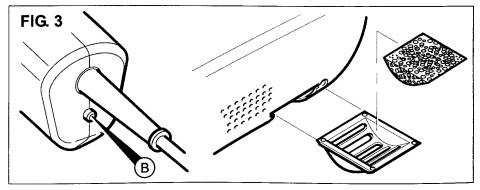
The motor is double insulated; do not connect any wire to the E or earth pin of 3-pin plugs. Wires in the mains lead are color-coded in accordance with the following code: Blue = neutral. Brown = live. Use 3-5 amp fuse.
Your use of the Valley Vet Supply website is governed by our Terms of Use and Privacy Policy. Please read them carefully before browsing or using the site. If you are using a screen reader and are having problems using this website, please call 800-370-4838 for assistance.

X
Our Terms of Use and Privacy Policy have changed. By continuing to browse this site, you agree to the Terms of Use and Privacy Policy.