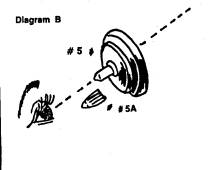
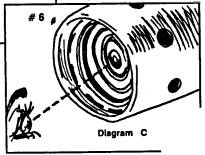
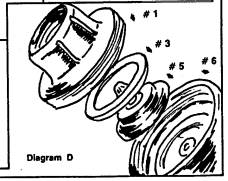
Hudson Control Valve Hudson Valve Company Installation: 1. See diagram A. 2. Use plumber's tape on threads of water supply pipe. Do not use pipe compound. 3. Screw Hudson Valve on to water supply pipe: hand tighten. 4. Turn on water. NOTE: there will be a short delay in shut-off the first time the valve is used while the control chamber fills with water. For Anti‑Siphon Installation: The critical level mark (C-L) shall be installed a minimum of 1" above the overflow rim of the receptor. Operating pressure limits: 8 lbs. to 140 lbs. Flow volume: about 80% of water source, valve slows water down approximately 20%. Unit measurements: 5" tall, 11" around, 3 1/2" diameter. MAINTENANCE: Under dirty water conditions, the Hudson Valve should be cleaned as needed using the following procedures: 1. Remove Valve from supply pipe. 2. Remove Valve cap (part #1) from body (part #6). 3. Flush screen (part #9) in cap. 4. Remove strainer (part #5A) from the diaphragm (part #5) and clean, making sure the hole in the center of the diaphragm is clear (see diagram B). 5. Loosen screw and remove the float (part #7) from the body of the Valve and check to make sure the hole in the center of the body is clear (see diagram C). 6. Re-assemble the valve by returning the float to the body and tightening the screw. Replace the diaphragm, making sure it is seated in the top of the body. Place the retainer ring (part #3) on top of the diaphragm with the flat side up. (see diagram D). Then replace the cap. Hand tighten the cap. Reattach valve to water supply using plumbers tape, not pipe compound.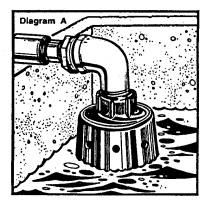
Your use of the Valley Vet Supply website is governed by our Terms of Use and Privacy Policy. Please read them carefully before browsing or using the site. If you are using a screen reader and are having problems using this website, please call 800-370-4838 for assistance.

X
Our Terms of Use and Privacy Policy have changed. By continuing to browse this site, you agree to the Terms of Use and Privacy Policy.